6 Steps To Build Awesome WooCommerce Store With Elementor – Step By Step (2022)

Are You Wanting to showcase your great business to the world?
You have landed at the exact place where you have to be.
Here you GO!
This guide shows each and every step towards how you can build your WooCommerce store easily & fast in WooCommerce using Elementor.
The combination of these will take your business to new heights.
Using WooCommerce you will have everything under your control.
It will help you stand out by giving full access to customization that you can customize your WooCommerce store the way you want.
Don’t underestimate WordPress for building a complex and enormous eCommerce store.
There are more than five million stores currently active on WooCommerce, so you can imagine the success level of these businesses with WooCommerce Store.
In this guide, you will learn to build a WooCommerce store with Elementor, product page & cart customization, and other essential things in depth.
After going through these six steps, you will have your own WooCommerce store ready to start selling.
So, without getting delayed, let’s hop into it.
Do you really need WooCommerce Store?
There are a lot more plugins out there to start with.
But, why WooCommerce?
Let me clear your doubt.
With WooCommerce, worries don’t come your way.
To make it clear,
Leave everything on the platform, just fill up your details about your store.
You don’t have to create anything like a cart page or checkout page.
WooCommerce will take care of these. There is everything pre-built.
Not only that, but there are other factors too that clearly shows why WooCommerce is the best place to build huge stores.
- The first and foremost thing is that this platform is a powerhouse of features.
You are free to sell anything you like.
It offers ample theme options to choose from. Also, offers in-built payment gateways.
- When it comes to SEO, WordPress stands out among other platforms. Your products will do better in SERPs.
WordPress has the powerful plugin “Yoast SEO” that helps take your products to people who actually need them.
- One more reason is that your whole WooCommerce store can build free of cost. Yet, there are some extensions & functionalities that don’t come free.
- When it comes to security, the plugin has its own API that gets regular security audits.
- Managing orders is a piece of cake for WooCommerce. It offers you an easy & intuitive interface.
These are just chunks of the reasons, but there are a lot more perks of starting a WooCommerce store.
1. Install & Setup WooCommerce Plugin In WordPress
Now, if you don’t know the installation process, then we are for that.
WooCommerce is nothing but just a plugin.
In order to install the plugin,
Head over to the left side of the WordPress dashboard.
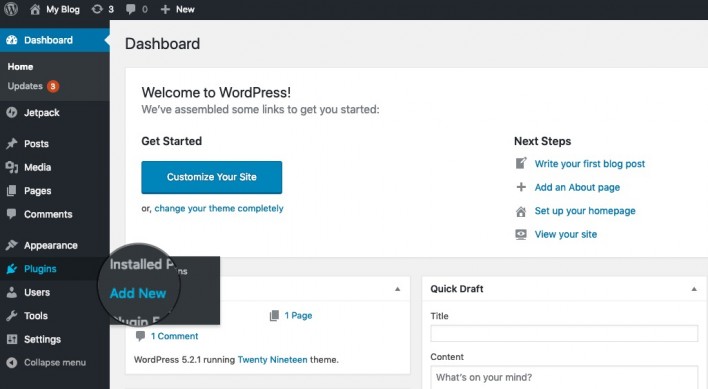
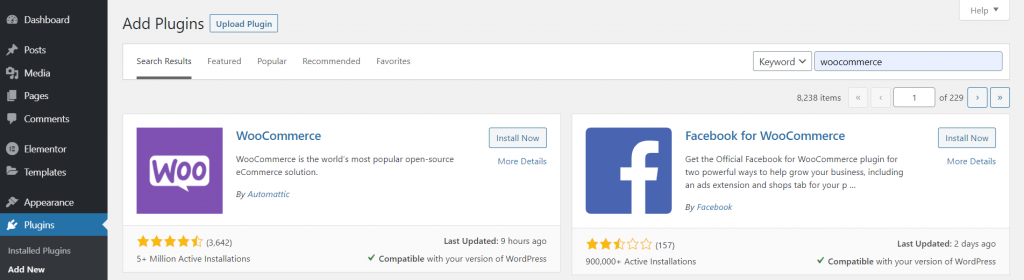
NOW, go to the plugins and click “Add New”.
Done.
The plugin has been installed.
After activating the plugin, it takes you through its setup wizard which you can follow step by step.
Yet, it’s up to you, either you can skip the process and manually install it the way you want or just follow along with it.
HERE, we are illustrating the whole setup wizard process, after installing a plugin.
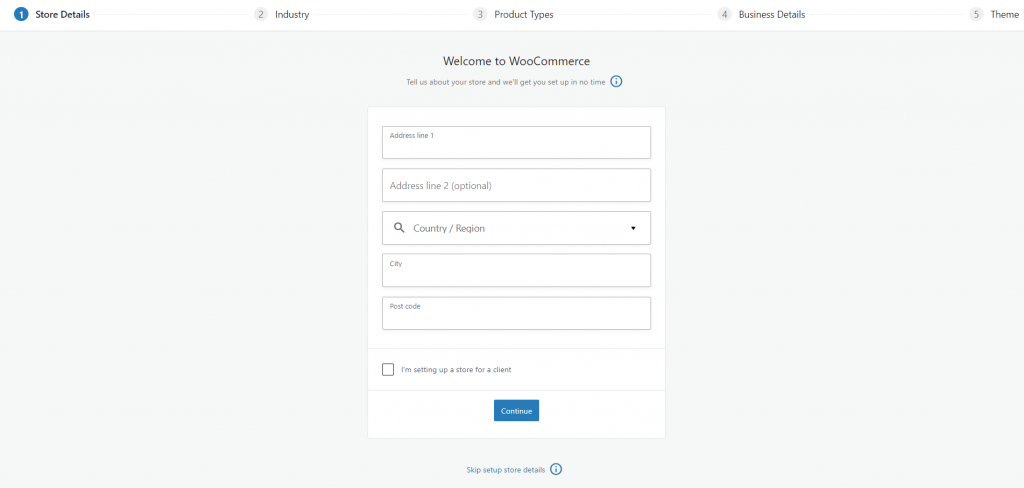
- Enter The Required Details:
The first page will ask you to fill up the basic information regarding what store you want to open.
- Select Your Industry:
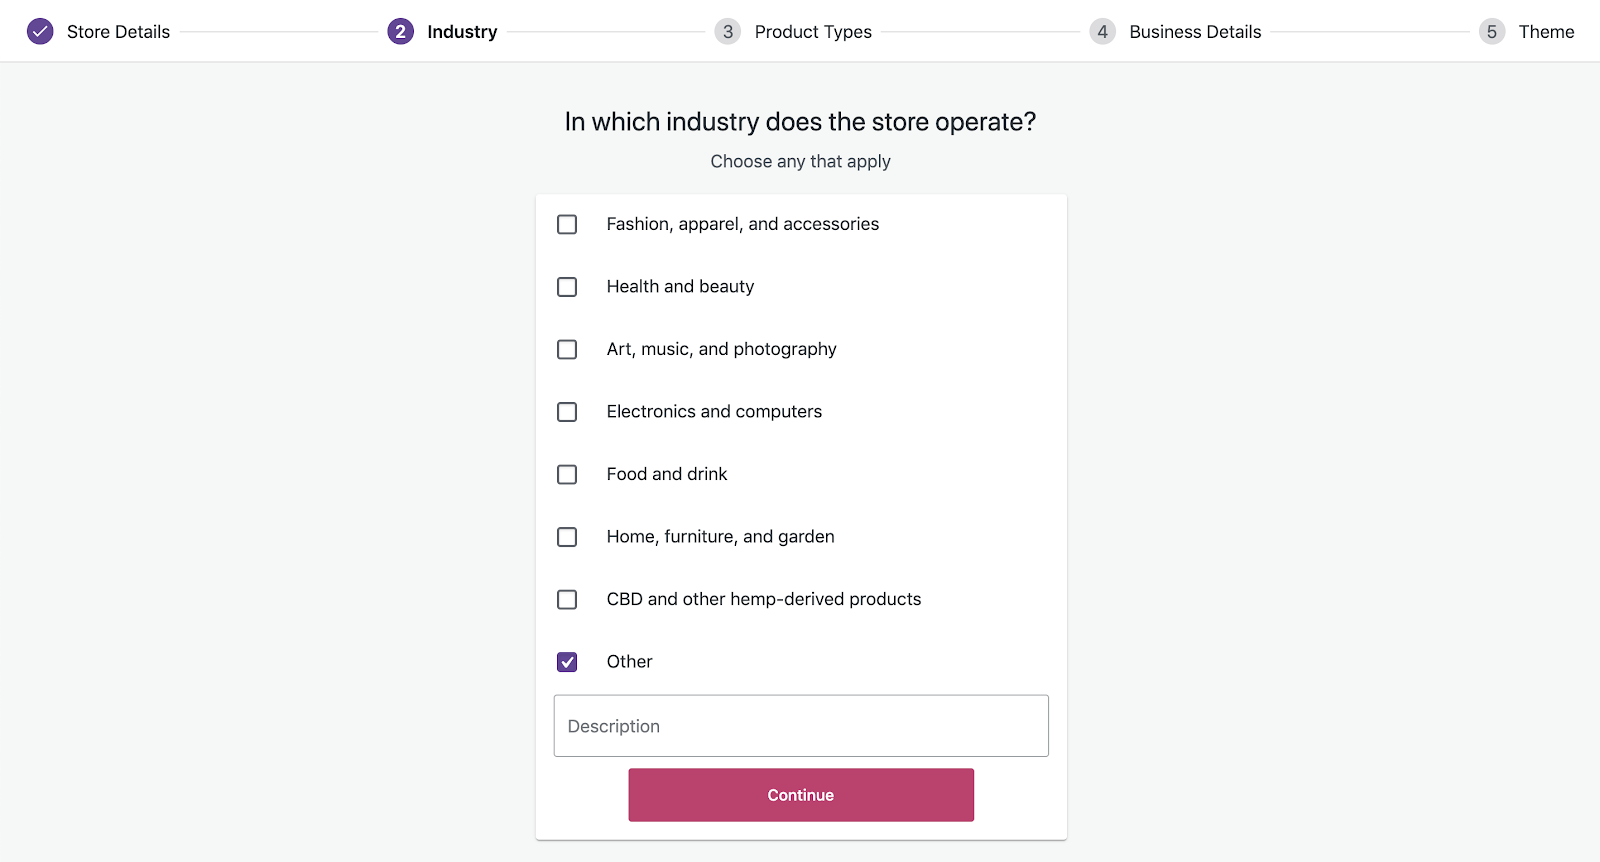
After clicking continue,
The next screen will pop up and show you the industry options.
You have to pick your industry in which your WooCommerce store will be set up.
- Product Listing:
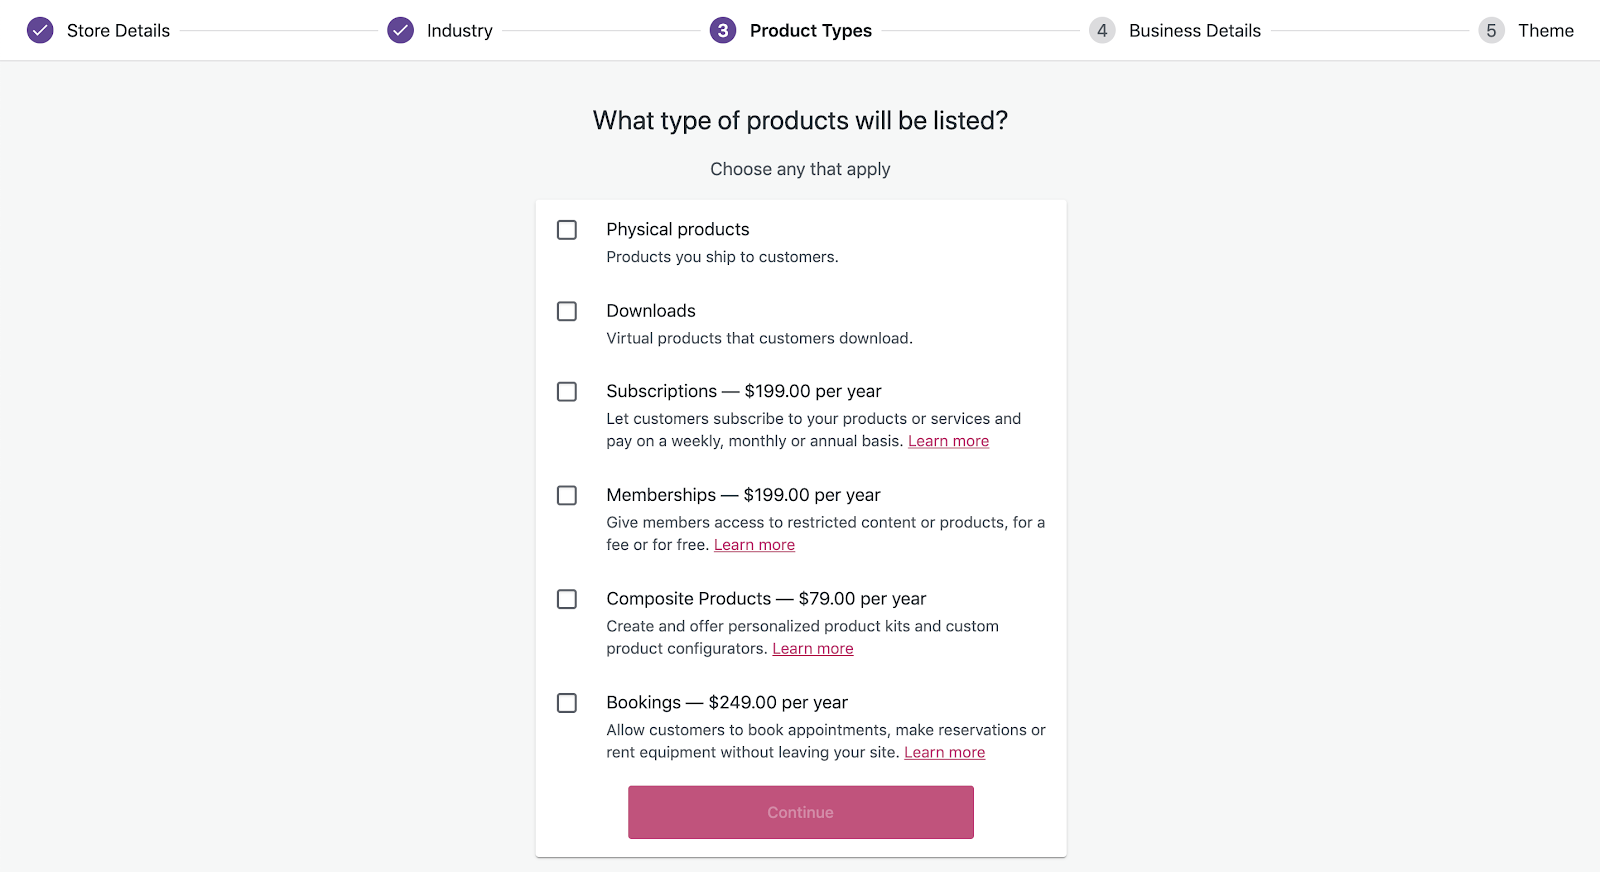
The subsequent screen will show you a bunch of categories.
You have to select what type of product you will sell.
Click continue.
- More About Your Business:
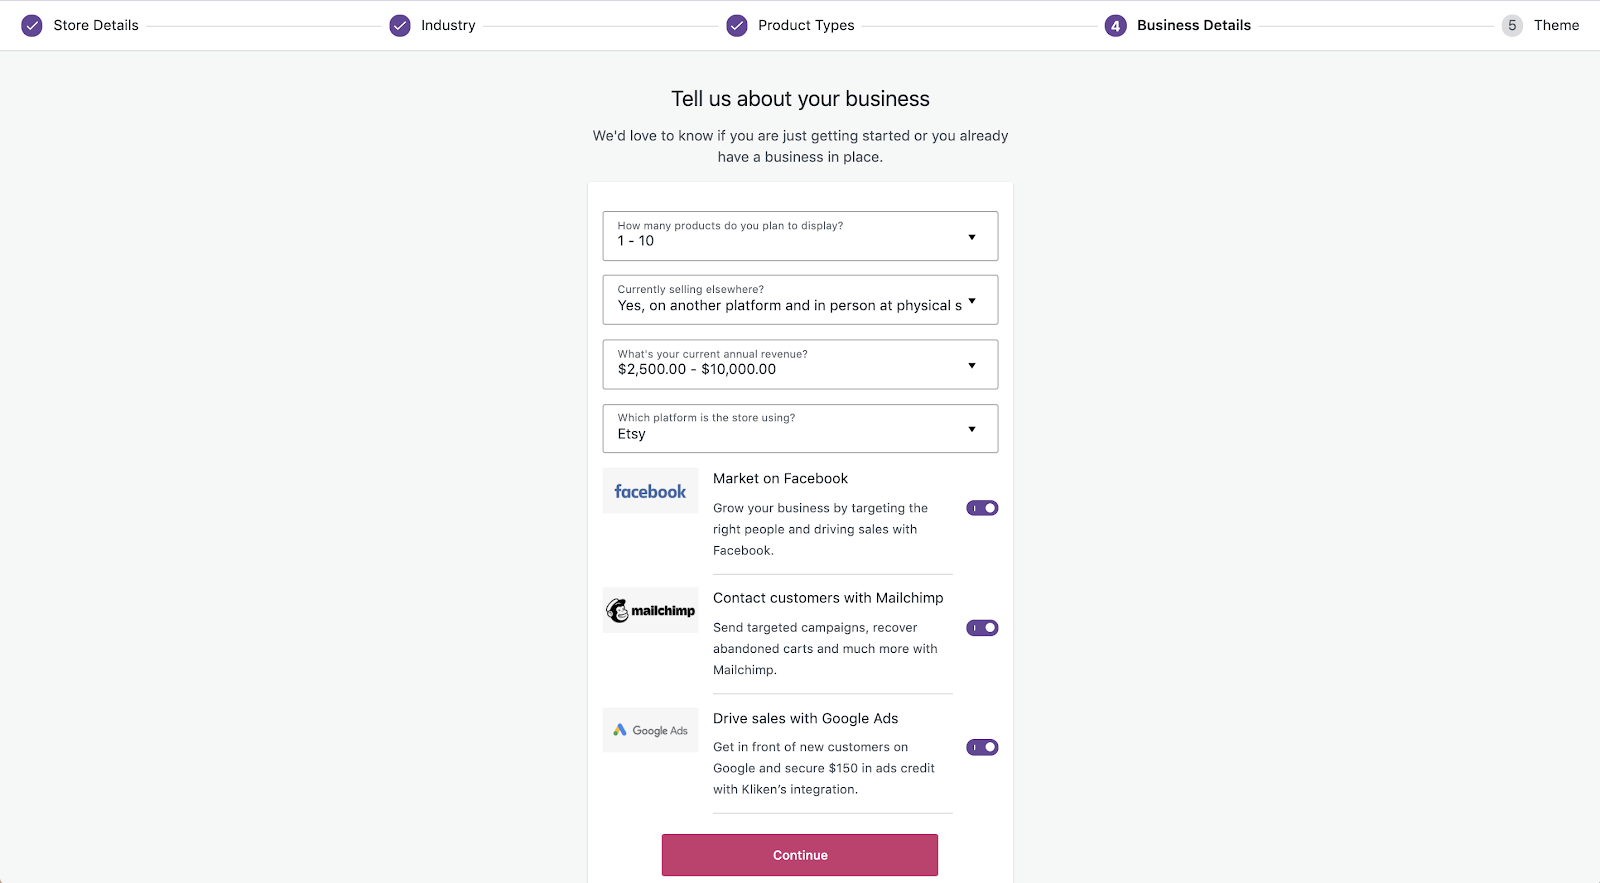
Now on the next page, you have to enter the number of products that you want to display.
And, asks you some more like if you are selling elsewhere or if you want to market on Facebook.
Select according to your preference.
- Choose Your Theme:
At last, it will ask you to select a theme for your store.
But before choosing a theme you need to consider certain criteria in order to select the perfect theme for your WooCommerce store.
Moreover, there are some other essential configurations you need to make.
6. WooCommerce Store Setup:
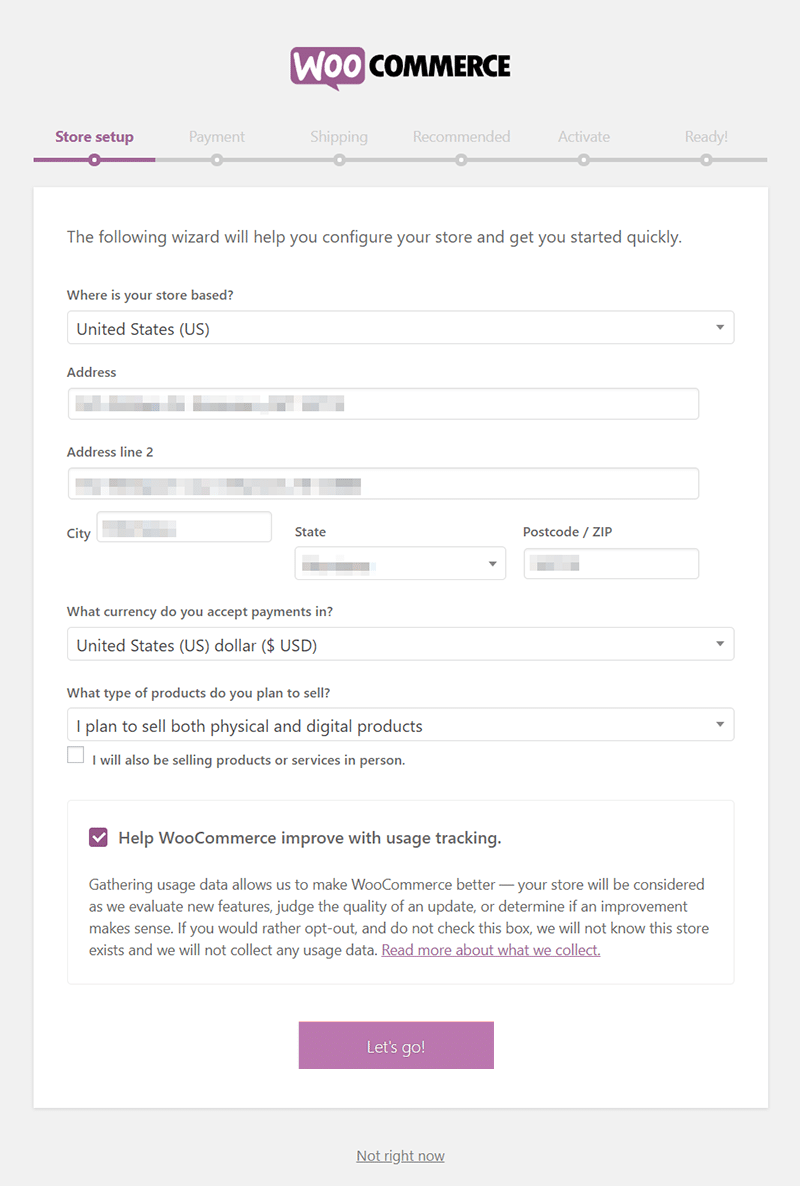
The first page of the WooCommerce store setup will ask you to fill some of the basic details about your eCommerce store.
Just fill-up the details such as your store’s location by country, address, state, postal code, currency, and type of product you want to sell.
That’s All.
- Configure Payment Gateway:
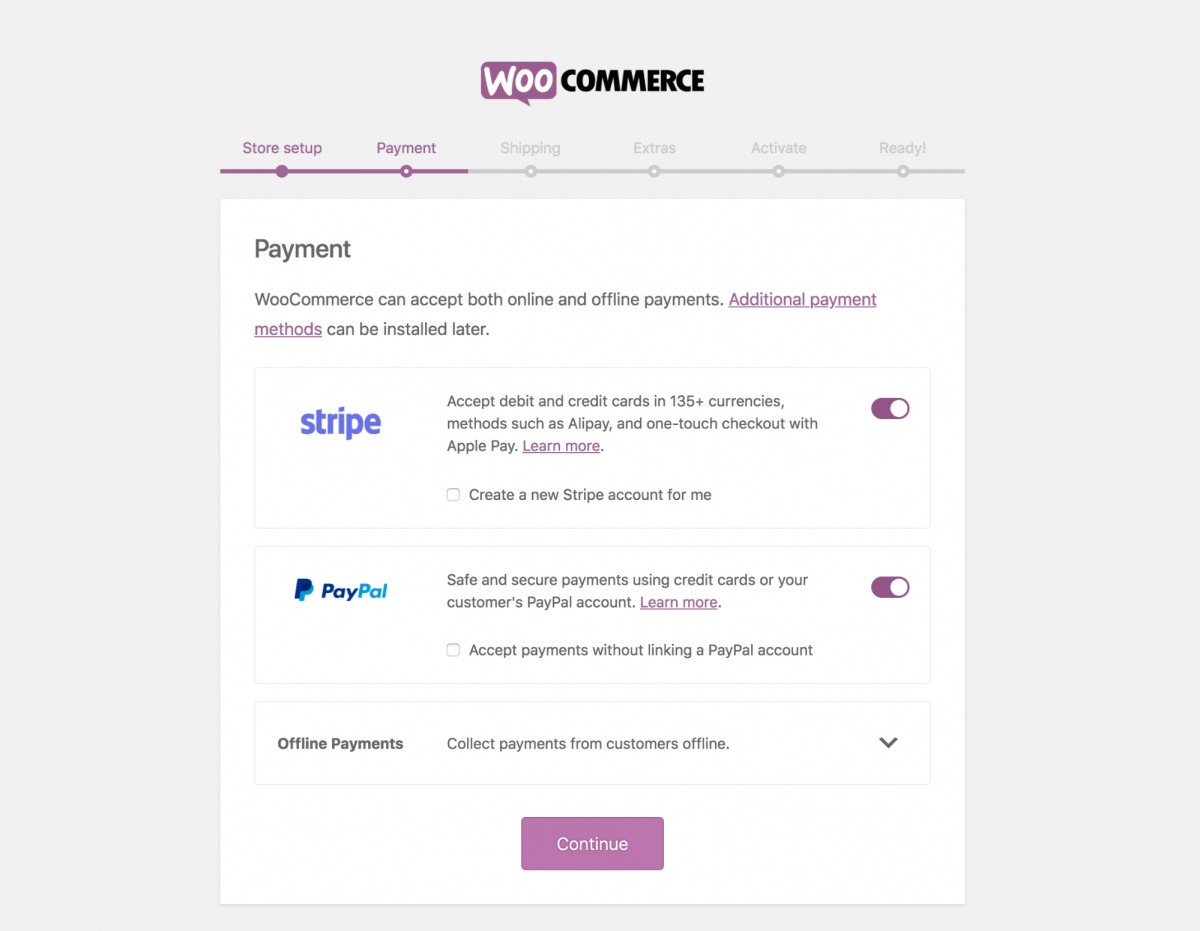
First, set up your payment gateway before you head to the other things.
There are few options to choose from whether you want to go with PayPal, COD, or bank transfer.
- Set Up Shipping:
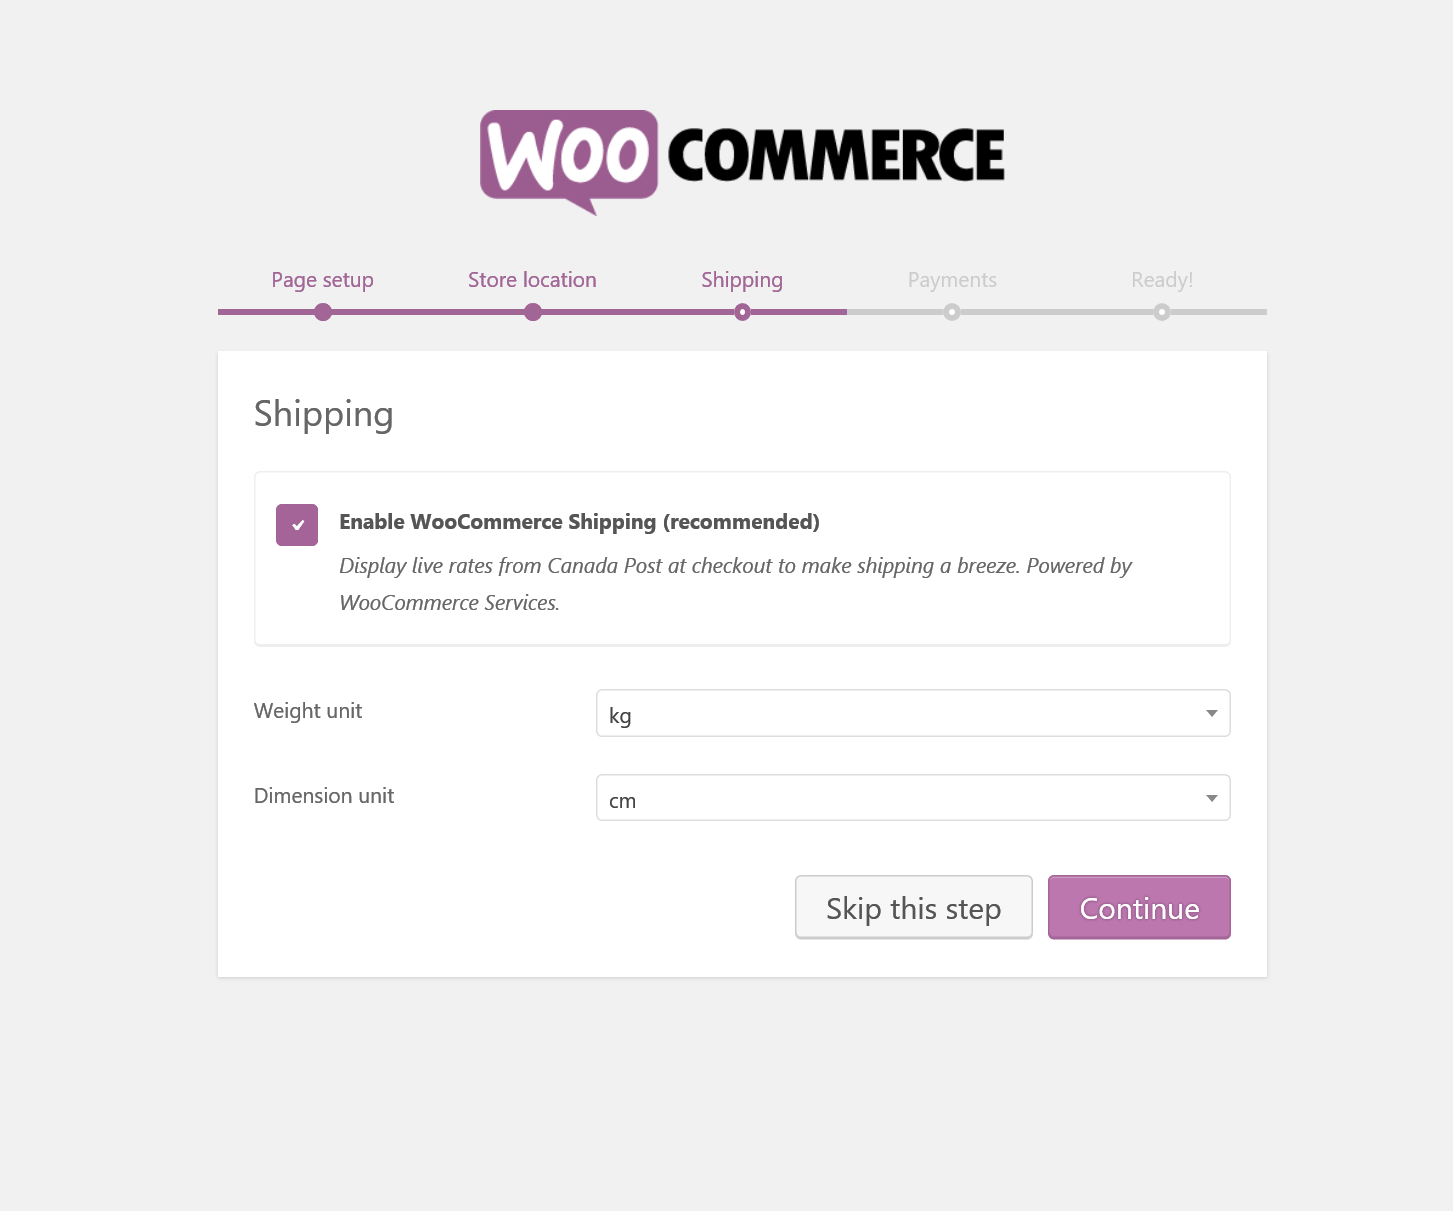
And if you are stuck somewhere then there are guides & docs related to it on WooCommerce.
We have completed pretty much here.
Also, we discussed the essential setups so If there’s something left to configure then you can set it up later.
Let’s head on to install Elementor.
2. Installation Process of Elementor
There’s nothing new in installing Elementor.
There are the same steps you have taken to install the WooCommerce plugin.
Go to the right side of the WordPress dashboard.

Click on to the plugin section and “Add new”.
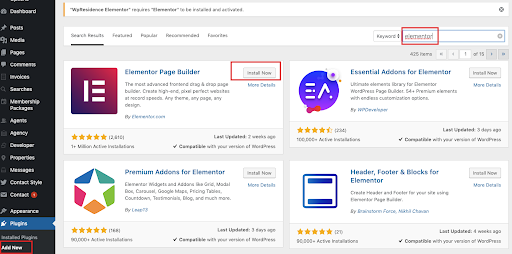
Search for the Elementor and install it.
The same process applies here.
After you activate the plugging, it will take you to the quick guide and makes you comfortable with its UI and all.
So that was the process of installing Elementor.
I hope you get it.
3. Product Page Creation With WooCommerce & Elementor
As you can see, we have installed both WooCommerce & Elementor plugins.
It’s time to create the first product page with WooCommerce.
So, let’s start step by step.
Step 1: Add Product
To start create a product.
Head on to the left side of the WordPress dashboard.
Products > Add New
Select products and click on the “add new”.
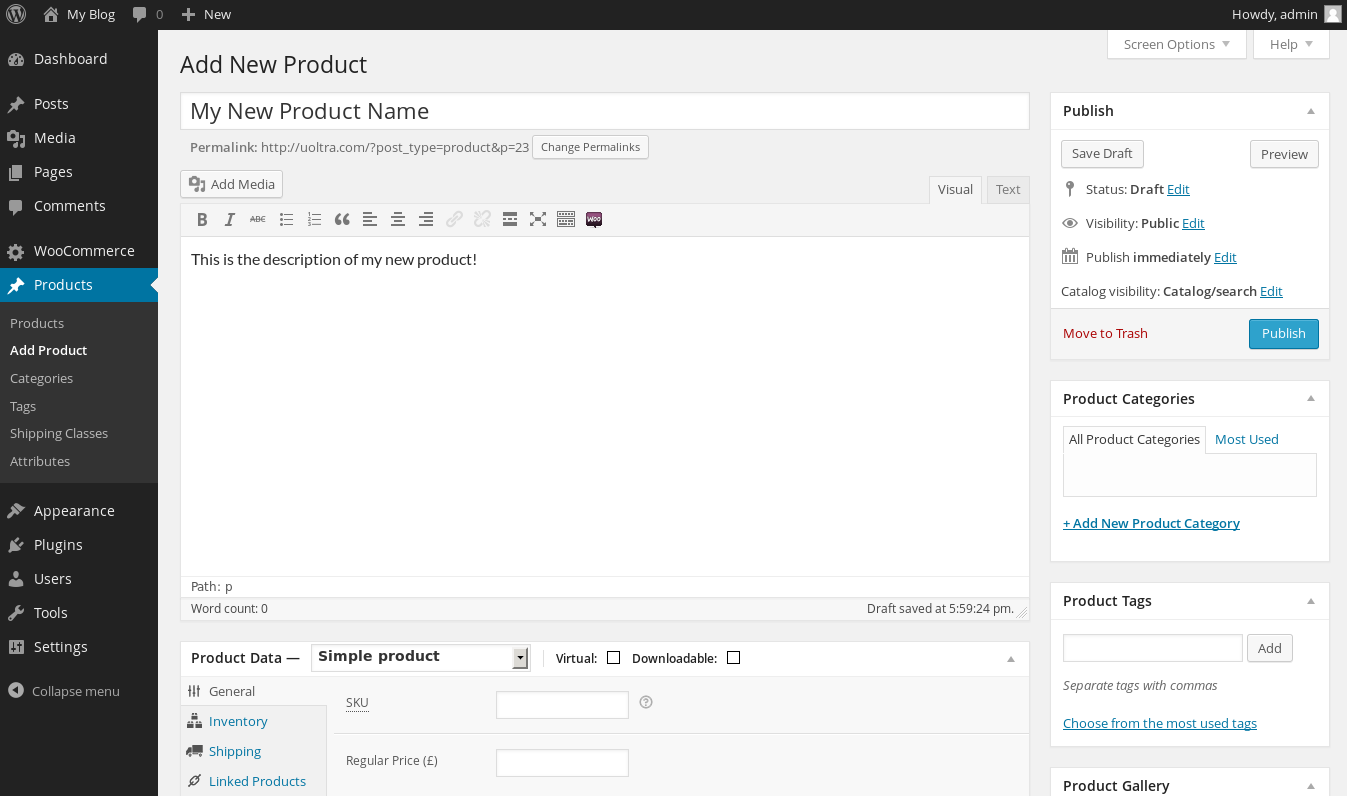
The new screen will give you the intuitive look with all the access and functionalities required in adding products.
As you can see from the image, there’s nothing complicated.
It works the same as creating a post or page, entering the product name and description.
Furthermore, there are many other options too such as product category, product tags, product gallery, product image.
Isn’t it just a matter of minutes?
Let’s get to the other options.
Step 2: Setting up Product Data
The first and foremost thing you need to do is specify the kind of product you want to create.
There is a total of four options to choose from:
- Simple Product,
- Grouped Product,
- External/Affiliate product,
- Variable Product.
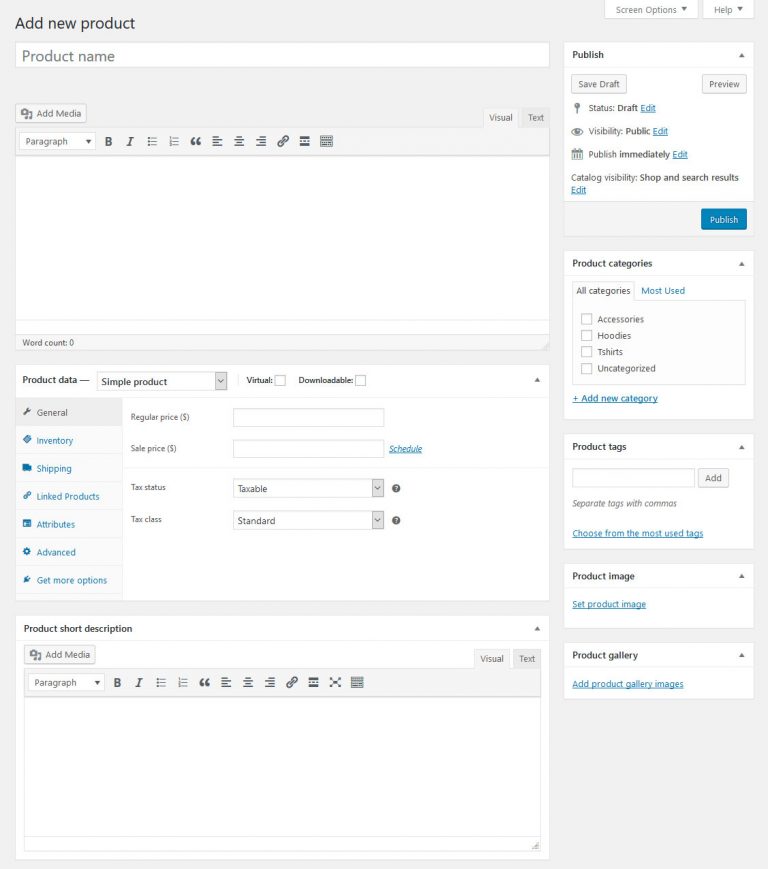
Next to the product data, you will find two checkboxes,
Virtual and Downloadable.
Now let me explain the use of both.
- Virtual means selling software that is non-shippable and not selling physical products like books, apparel, toys, and more.
- It is evident from its name that by checking the box you will be able to upload files and set the download parameters.
Looking over to the left column there are few options to look over.
General:
In this section, you will see two boxes of regular price and selling price.
Add the MRP or the actual price of the product in the regular price box.
In the sale price box, enter the price you want to sell the product for.
Inventory:
You can set out the SKU of your product, manage stock, stock quantity, backorders, and more.
Shipping:
You have to add the product’s weight, and dimensions like length, width, height, etc.
Rest are Linked products, attributes, variations, and advanced.
To see what you have created, hit the view button.
Now add more products and test out by using other options.
You will find your created products in the “all products”.
Step 3: Design Your Product Page Using Elementor
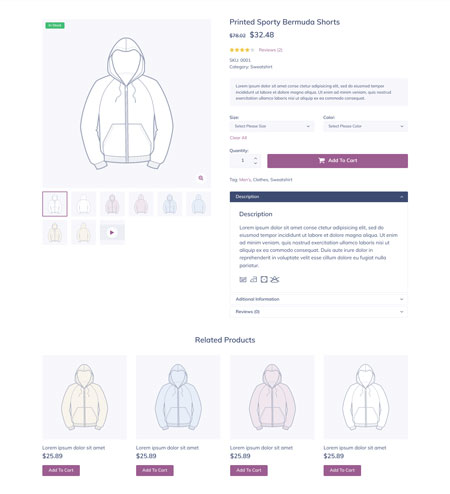
Now if you have successfully created your product page, it’s time to give it a unique and appealing look to your product page.
You will find a ton of templates of the product page, just select the “single product” under the blocks section in Elementor.
Select the template you liked, the subsequent screen will take you to the Elementor builder.
Now you can edit the template you have chosen or leave it as it is.
Apart from that, there are Elementor widgets that may be very useful for what exactly you are selling.
Some of the very useful widgets such as product rating, product content, short description, and more.
Step 4: Publish Your Design
You need to make sure that you have selected the “products” from the drop-down before you hit the Publish button.
Click on save.
Your selected design will be set for all of your product pages.
4. WooCommerce Store: Shop Page Creation With Elementor
Ready to get creative?
It’s essential to have an attractive looking shop page where your customers can purchase your products.
WooCoommerce has already installed some of the basic pages that every eCommerce store should have like cart page, checkout, and more.
To begin customizing your shop page with Elementor, you need to make a product archive.
In order to create a product archive,
Head over to the WordPress dashboard, where you will find theme builder under templates.
Templates > Theme builder
NOW, hit the “add new” button.
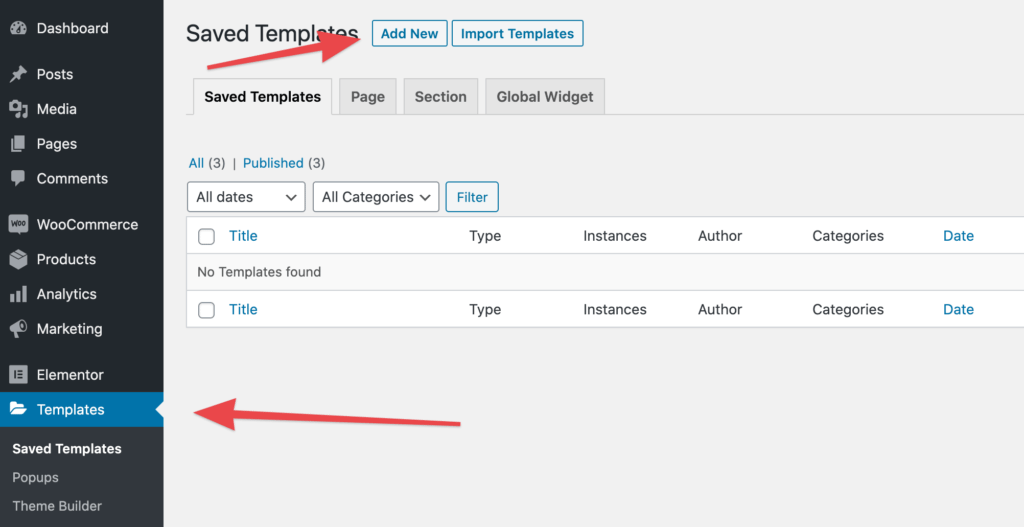
And select “product archive” from the template type dropdown menu.
Create your template by giving it a name.
After that, Elementor will display you all the available product archive templates that you may want to use for your WooCommerce store.
Select the one you liked.
Your chosen template will open in the Elementor editor.
It’s up to you whether you want to edit further or leave it as it is.
Now if you are done with your choice, then click the PUBLISH.
A popup will open then, where you have to select the “All product archives”.
SAVE it.
It will show your selected archives on your website.
5. Cart & Checkout Page Organization
The two most essential pages to set up are cart and checkout pages.
Editing in the checkout page can only be done via WordPress customizer.
Now if you want to change something then you can apply your change in the customizable.
Moreover, you can drop it via the [ woocommerce_checkout ] shortcode into any page template.
In order to do that,
Create a page and then edit it with an Elementor.
BUT, how can you paste the shortcode?
Add the widget name “shortcut” and paste your code wherever you want it to appear.
Save & publish.
After you set everything up to your preference then just define your new page as your checkout page.
Follow the path to do that: WooCommerce > Settings > Advanced
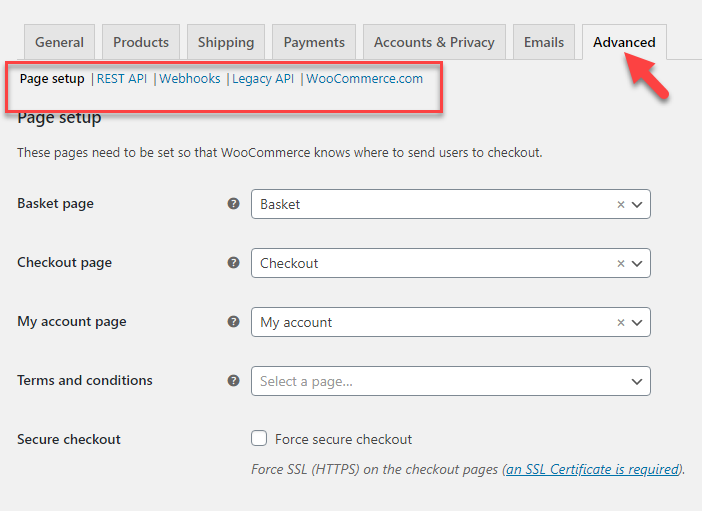
You will see your new checkout page once you get there.
The same process applies to the shopping cart.
You only need to change is a shortcode [ woocommerce_cart ].
Also, if you want to have full control over the customization of cart, checkout, my account or any other part of your WooCommerce store with Elementor, you can install a good WooCommerce Elementor addon like CoDesigner.
6. Essential Settings Related To Your WooCommerce Store
Last point of creating an awesome WooCommerce store.
We will look over other important pages, menus, and extensions that you need to pay attention to when building a WooCommerce store.
Coupon Page:
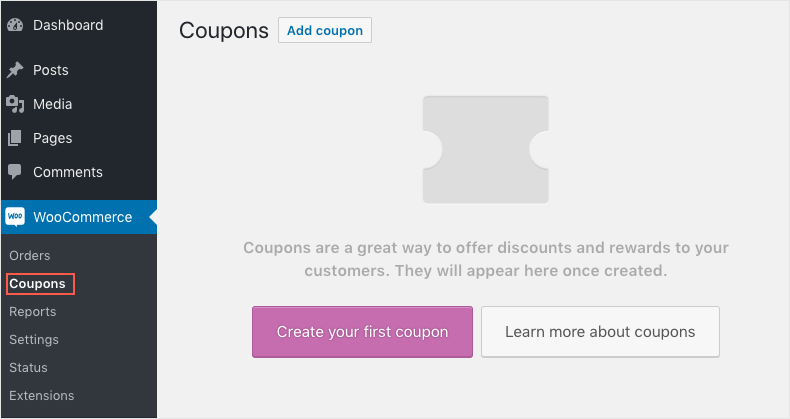
If you are building a WooCommerce store then you should have coupons for your customers.
The concept isn’t new. It is actually an extra perk for customers.
It’s essential to have because people are always looking to grab an extra discount via adding coupons.
And if they get the discount, they will come again to shop from your WooCommerce store.
Ultimately, it helps increase sales.
To make your coupon, there are some changes you need to look over such as discount type, coupon amount, user restriction, coupon expiry date, and more.
Your Orders On WooCommerce Store:
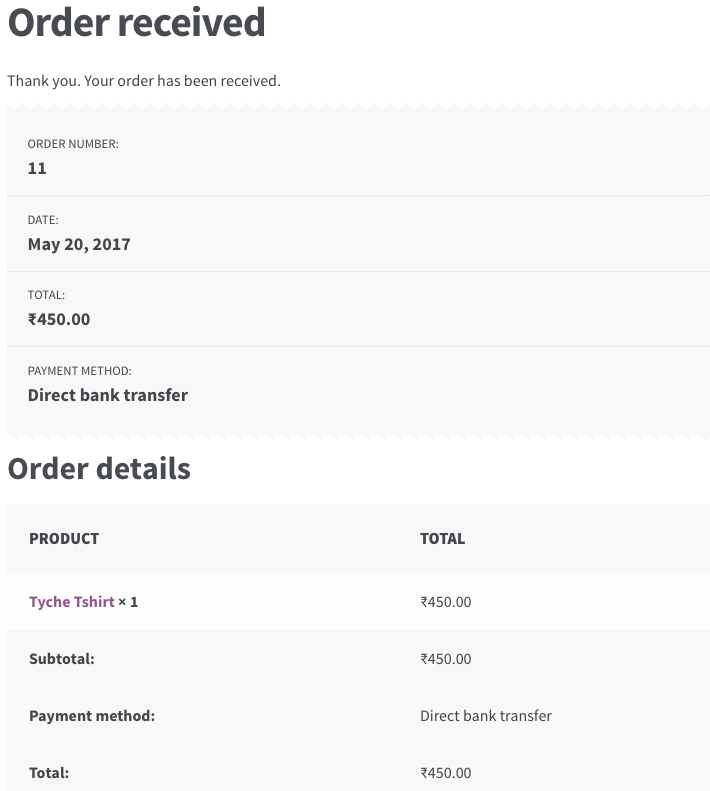
On the order page, you will see your current orders and its status.
Not only that, but the page will show you everything related to the orders like shipping address, order total, timing, etc.
However, there is a lot you can modify such as shipping details, refund order, billing, and more.
Extensions:
There is an extension section in WooCommerce.
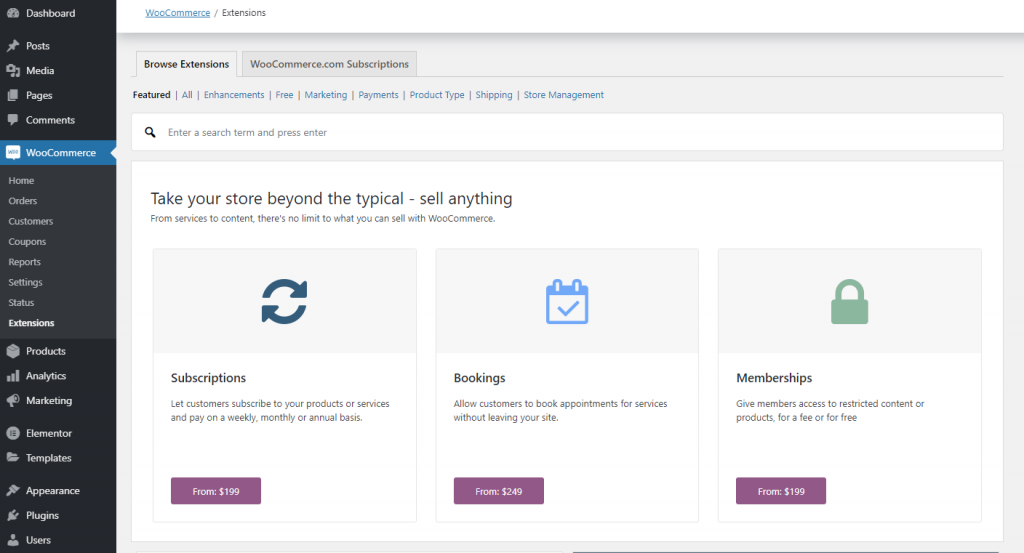
Where everything has already been set, if you want an extension to install.
Just click on it and it will redirect you to its official website where you can purchase right away.
Furthermore, you can also go to WooCommerce’s official extension store to search for whatever you need.
You may have the question: what are these extensions?
These extensions are extra add ons which intensify your WooCommerce store.
It gives you the best performance and extra functionalities that your store needs.
Here I have listed some of the useful extensions for WooCommerce Store that you need.

As you know, who has time these days?
People are always looking for an easy way to get the solution.
And live chat comes with that type of facility.
Having a “Live Chat” on your website will help convert your visitor into your customer by solving the problem in a rapid manner.
The Good is that the plugin extension comes free.
As the name implies,
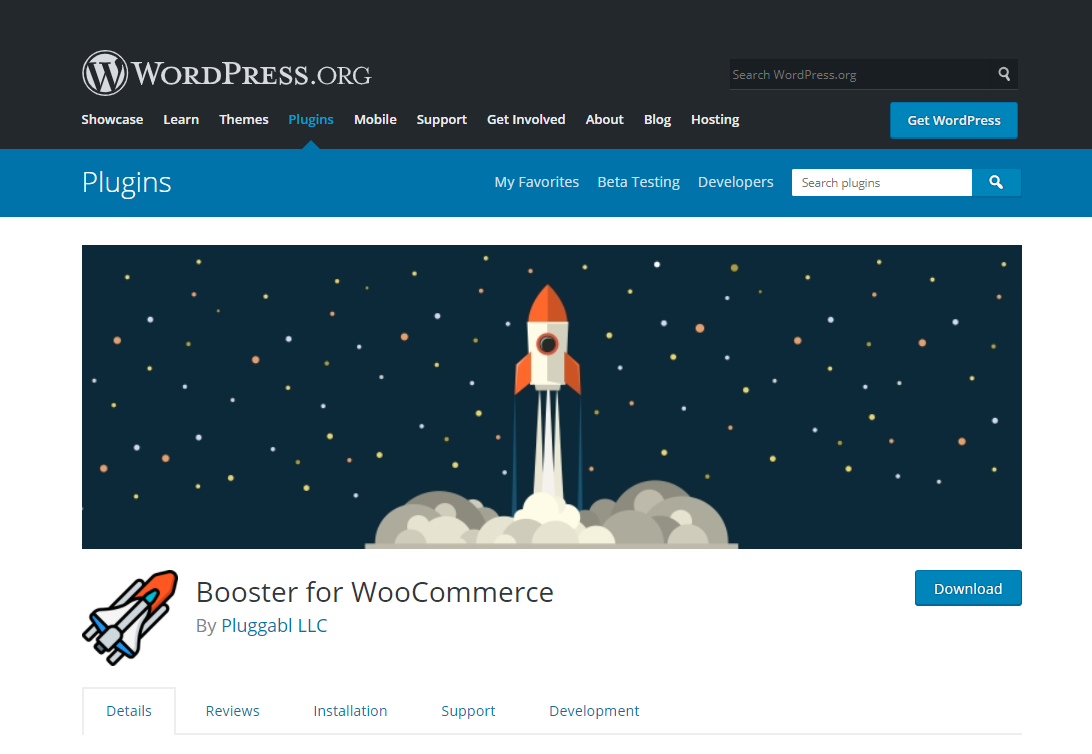
When you add this extension to your WooCommerce store, it will dramatically improve your website’s performance and help run your store more smoothly.
It has tons of more features that are very useful to your store.
Running your store is not an optimal solution without getting this plugin installed.
The plugin, however, comes in two versions: Lite and pro. In the WordPress plugin store, you will easily get the Lite version (which is completely free).
Best Features:
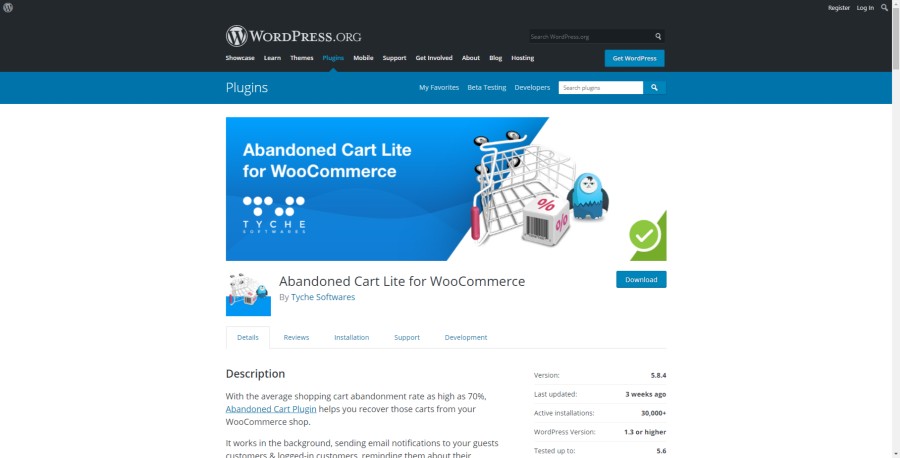
Abandoned Cart plugin will help get your customer back to your store to check out the product they left in the cart.
It helps you to send emails to customers who have just left their cart and have not made a checkout with its automatic reminder feature.
However, once your customers have made the payment, it will stop sending emails to them.
The creation of templates that can be sent at intervals you have set does not have a limit.
Although, you can only send an email after the cart has been abandoned for 1 hour.
Last Words On Building Awesome WooCommerce Store With Elementor
I hope you get how you can create a product, set up the cart and checkout page, shop page creation, designing with an Elementor, and more.
Selecting WooCommerce is the best decision you took for your eCommerce development.
The plugin comes free of cost which is a great advantage. Moreover, The plugin has loads of features and tools.
Though, if you are stuck somewhere between, you can always refer to this guide.
One thing we missed out on here is, which theme will you use for your WooCommerce store?
We have got some amazing, responsive, and modern looking themes:
KartPul: Multipurpose WooCommerce Theme
Limo: Clean Multipurpose WooCommerce Theme
Alceste: A Clean & Modern WooCommerce Theme
If you want your business to stand out from your competition, then these themes you really need.
Share your thoughts like which extension will you use? Your preferred theme? What & how will you customize your shop and product page.
We’d like to hear from you!


![7 Best WordPress Hosting Providers [Detailed Analysis]](https://templatemela.com/wp-content/uploads/Best-WordPress-Hosting.jpg)
Thank you for sharing, It helps to set up my online eCommerce shop. Can you suggest me payment plugin which accepts payment in china?
With Alipay Cross Border Payment Gateway you’ll be able to accept payment in china also.