How To Add Free SSL Certificate To WordPress Website With cPanel?
You should install free SSL certificate on your domain as soon as possible to protect your WordPress website, and thanks to Let’s Encrypt, you can do it for free.
With the use of an SSL certificate, you can prevent hackers from intercepting and stealing user information by encrypting the connection between your website and its browsers.
Generally, installing SSL certificates may be difficult and expensive, but things are changing quickly.
A new open source certificate authority called Let’s Encrypt is supported by well-known businesses including Facebook, Mozilla, Chrome, Cisco, and Sucuri in addition to Automattic, the company that created WordPress.
The project’s goal is to make SSL certificate installation automatic and free for everyone.
You may quickly add a certificate to your website with the aid of Certbot, an automatic installer from Let’s Encrypt.
Although Certbot is now in public beta and there will be many modifications in the final version, the current version is stable enough for you to test on live websites.
What Does The SSL Certificate Imply To You As A Site Owner?
Think about seeing a notice that a website you are visiting using Google Chrome is not safe.

After that, are you going to reload or close the website?
Visitors to a website are turned off by a security notice.
The likelihood is that you will lose more than 50% of your traffic if Chrome warns users about your website’s lack of HTTPS.
Therefore as a consequence of not installing an SSL certificate on your website, many potential purchases and inquiries were lost.
The fact that Google rewards websites that employ HTTPS with higher rankings are another motivation to do so:
It is obvious that you must install an SSL certificate on your website.
The crucial concern is: How can you add a free SSL certificate to your website?
Continue reading to find out how to easily add HTTPS to your website with Let’s Encrypt.
Why Should You Install An SSL Certificate?
Web protocols for data transmission and communication security include Secure Sockets Layer (SSL). All data requested from the server and returned in accordance with the protocol is encrypted, preventing unauthorized access.
The following are the principal advantages of having SSL enabled on your website:
- SSL encrypts critical information, which improves website security. It assures secure data transmission and connectivity.
- Boosts credibility – activating SSL protocol demonstrates your dedication to protecting visitor data, securing online transactions, and GDPR compliance.
- Enhances SEO ranking – well-known search engines like Google give HTTPS-enabled sites higher rankings in their SERPs.
You must first get an SSL certificate from a certificate authority (CA) before you can enable SSL on your website. The majority of hosting companies, like Hostinger, provide fantastic SSL packages that are not only inexpensive but also simple to set up.
Don’t worry whether you’re on a limited budget; numerous nonprofit certificate authorities, such as Let’s Encrypt, offer SSL certificates without cost.
Keep in mind, though, that Let’s Encrypt’s free SSL certificates are indeed effective (valid) for 90 days. To keep its advantages, you must recertify it frequently.
About Let’s Encrypt.
The Internet Security Research Group runs a brand-new certificate authority called Let’s Encrypt.
Its endeavor is focused on making SSL certificates available to everyone for free and automatically.
The service now provides complete support for IPv6, IDN, ACME DNS challenge, and ECDSA signature.
Let’s Encrypt objectives are to make it simple for regular people to set up an HTTPS server and have it automatically receive a browser-trusted certificate.
One of the key reasons for Let’s Encrypt’s popularity among developers is that it is open source.
Simply expressed, this means that it may be updated, improved, or fixed by programmers (if necessary).
How To Install Free SSL On Your WordPress Site?
There are two primary methods for obtaining an SSL certificate from Let’s Encrypt. The manual method, which is the first option, entails starting from scratch by reading the official Let’s Encrypt instructions.
If you want an even simpler, WordPress-specific solution, your best bet is to locate a server that specifically supports Let’s Encrypt.
We’ll describe how to add a free SSL certificate to your website using a method that is special to WordPress in this article. Make a complete backup of your website before you start, as per usual.
#1 – Use A Host With Built-in Let’s Encrypt Setup
Some hosting providers are now providing built-in Let’s Encrypt configuration as the service gains prominence.
One of the most well-known and reliable hosting services with a built-in Let’s Encrypt implementation is SiteGround.
In this guide, we’ll show you how to add HTTPS to your website using SiteGround’s Let’s Encrypt service.
Make sure that if you are using another hosting provider, you should check to see if it includes built-in Let’s Encrypt. The procedure for adding HTTPS ought to be very similar.
#2 – Activate Free SSL From Let’s Encrypt In SiteGround
Browse your cPanel by searching http://yourdomain.com:2083 or http://yourdomain.com/cpanel in your browser.
Navigate to the Security settings and choose the Let’s Encrypt SSL symbol.

You also can conduct a search for “Let’s Encrypt” in a web search.
Reach your hosting service right away for assistance if you can’t find the Let’s Encrypt SSL option.
Select the Let’s Encrypt option. You’ll then be sent to the Let’s Encrypt installation page.
In this box, you must enter your email address and choose the website to which you wish to add HTTPS.
Hit the Install button.
A distinct SSL certificate will be generated for your website by Let’s Encrypt within a few seconds (or occasionally within a few minutes). Upon completion of the installation, a success message will appear.
It ends there. Let’s Encrypt Free SSL has been deployed successfully on your WordPress website.
However, HTTPS is not yet ready for usage on your website. You must resolve issues with unsafe material and adjust your website’s URL.
#3 – Update the URLs of the WordPress websites
To utilize SSL, you must update the URL of your website from HTTP to HTTPS.
A web page with HTTP appears as http://www.demo.com.
The URL of an HTTPS website is https://www.demo.com.
After that, let’s modify the URL of your website.
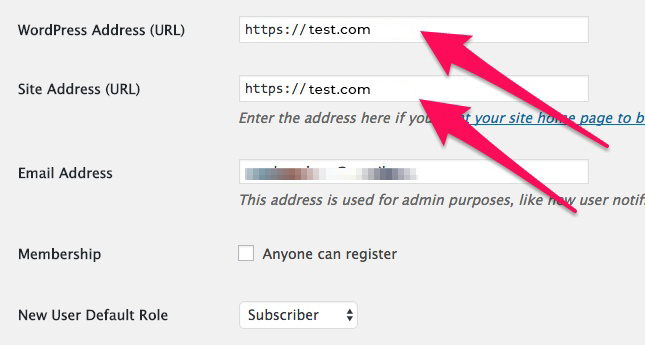
Navigate to the Admin Dashboard of your WordPress website and select Settings.
You must change the WordPress Address (URL) and Site Address (URL) to utilize HTTPS in this case.
Changes should be saved.
#4 – Resolve Insecure Content Problems
After saving modifications in Step 3, you will be logged out of your site. To re-login, input your username and password.
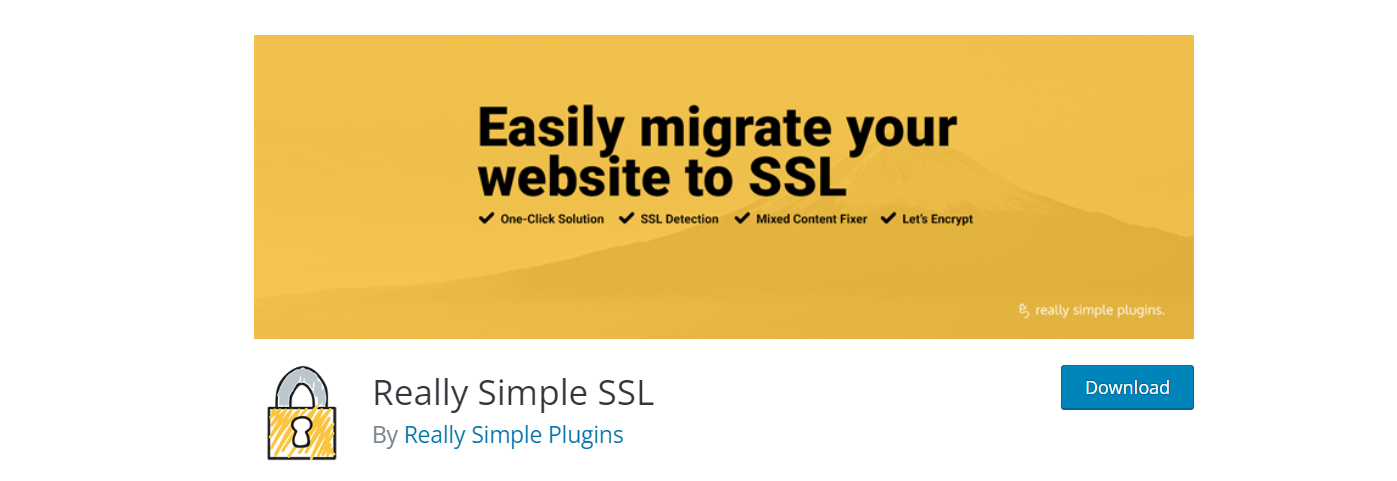
Problems with insecure content may be quickly solved with the Really Simple SSL WordPress plugin. Installing and turning on this plugin are required.
Issues with unsafe material will be immediately fixed by the plugin. Additionally, your SSL certificate will be instantly found and added to your website. You typically don’t need to take any action.
#5 – Make changes (update) To Your Google Analytics Configuration
There is no connection between this step and installing HTTPS on your website. If you performed Steps 1 through 4, you have successfully implemented HTTPS on your website.
Bravo!
It is highly recommended to proceed to Step 5 if your business utilizes Google Analytics.
When you add HTTPS to your website, the URL changes from HTTP to HTTPS.
You must thus change Google Analytics options and provide the new HTTPS URL for your website.
- Access your Google Analytics dashboard by logging in.
- Select “Admin” from the top Menu.
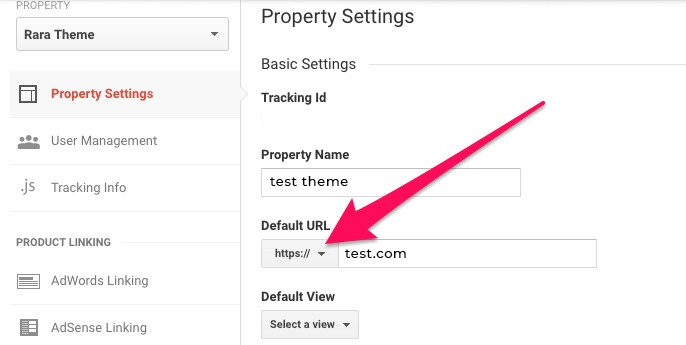
- Go to your website’s property settings by clicking there.
- You will see the choice of the default URL. Tap HTTP and then choose HTTPS.
- End up saving your changes.
That’s all there is to it!
Summary of findings.
All websites must now use the SSL protocol as part of their security setup. You should not be concerned if you haven’t enough resources to purchase an SSL certificate.
You could yet utilize the Let’s Encrypt free SSL certificate while still reaping the benefits of SSL.
Is this article helpful to you? Leave us a comment and let us know!